[Powershell] Missing shared custom modules when using Powershell Remoting

In my previous post: Centralize Powershell Script (Modules) Repository, it describes on how to create a custom module and load it on any server. And like the title of this post indicated when you try to connect to a remote server using Powershell remoting, you’ll notice that the custom module is missing ( More information about Powershell Remoting ). This is  because it’s doing a double-hop, First hop is to connect to server (using Enter-PSSession or New-PSSession), next hop is to access the shared folder containing the custom module.

To solve this issue we need to Enable the Credential Service Security Provider (CredSSP) both on remote and host server.

#1 On the server wherein the powershell console instance is started you need to enable the client role.

#2 On the server wherein you want to connect remotely you need to enable server role.

#3 On the server wherein the powershell script is hosted you also need to enable the server role.

Run the following scripts (Run as Administrator):

Script for # 1:
Enable-WSManCredSSP -role Client -DelegateComputer  -force
Script for # 2:
Enable-WSManCredSSP -role Server -force
Script for # 3:
Enable-WSManCredSSP -role Server -force

Powershell remoting with CredSSP:

To connect either by Enter-PSSession or New-PSSession you need to supply extra argument:

$session = New-PSSession -ComputerName  -Authentication CredSSP -Credential Get-Credential

Since i used Get-Credential it would prompt for credential:

Update:

If it still doesn’t work, try restarting the Windows Remote Management (WS-Management) service.

In Run Type, services.msc

In the Name look for: Windows Remote Management (WS-Management), right click Restart.

[Powershell] Centralize Powershell Script (Modules) Repository

In this post I will try to describe on how you can centralize your powershell scripts (custom modules) so that it can be  loaded from any servers in the system.

Note: The sample below is using Powershell v2.0 and is intended for Windows Server 2008 and up.

Centralize Powershell Repository Diagram:

Centralize Powershell Scripting Diagram

In this diagram it states that there are 3 custom modules on the powershell scripting server that can be loaded from any of the servers in the network.

Powershell Server Setup Steps:

Necessary steps needs to be undertaken to the Powershell Server is as follows:

1. Create a shared folder in the PS Server that will contain all the custom modules. Assign appropriate permissions.

2. Create/move custom modules in the shared folder. On instructions on how to create a custom module, click here.

Quick Guide: Creating Custom Powershell Module

Creating a custom script module is quite easy, you just need to create a psd1 file (contains manifest information) and psm1 file (basically contains the dot sourcing of all scripts you want to load in the module) and place it in a folder with name equal to the module name.

Sample Folder structure: The C:\Modules will be setup as shared folder.

Contents of Sample.psd1 file

#
# Module manifest for module 'Sample'
#
# Generated by: Randy Aldrich Paulo
#
# Generated on:
#

@{

# Script module or binary module file associated with this manifest
ModuleToProcess = 'Sample.psm1'

# Version number of this module.
ModuleVersion = '1.0'

# ID used to uniquely identify this module
GUID = 'c78688f252-fc04-413a-8b0e-5cfc7e78dcd6'

# Author of this module
Author = 'Randy Aldrich Paulo'

# Company or vendor of this module
CompanyName = 'My Company'

# Copyright statement for this module
Copyright = '(c) 2012 Randy Paulo.'

# Description of the functionality provided by this module
Description = 'Description'

# Minimum version of the Windows PowerShell engine required by this module
PowerShellVersion = ''

# Name of the Windows PowerShell host required by this module
PowerShellHostName = ''

# Minimum version of the Windows PowerShell host required by this module
PowerShellHostVersion = ''

# Minimum version of the .NET Framework required by this module
DotNetFrameworkVersion = ''

# Minimum version of the common language runtime (CLR) required by this module
CLRVersion = ''

# Processor architecture (None, X86, Amd64, IA64) required by this module
ProcessorArchitecture = ''

# Modules that must be imported into the global environment prior to importing this module
RequiredModules = @()

# Assemblies that must be loaded prior to importing this module
RequiredAssemblies = @()

# Script files (.ps1) that are run in the caller's environment prior to importing this module
ScriptsToProcess = @()

# Type files (.ps1xml) to be loaded when importing this module
TypesToProcess = @()

# Format files (.ps1xml) to be loaded when importing this module
FormatsToProcess = @()

# Modules to import as nested modules of the module specified in ModuleToProcess
NestedModules = @()

# Functions to export from this module
FunctionsToExport = '*'

# Cmdlets to export from this module
CmdletsToExport = '*'

# Variables to export from this module
VariablesToExport = '*'

# Aliases to export from this module
AliasesToExport = '*'

# List of all modules packaged with this module
ModuleList = @()

# List of all files packaged with this module
FileList = 'DataMgtDeployment.psm1'

# Private data to pass to the module specified in ModuleToProcess
PrivateData = ''

}

Contents of Sample.psm1 file

#
# DataMgtDeployment Module
#

$ModulePath = \\PowershellServer\Modules\Sample
# Set the location
Set-Location $ModulePath

# Reference the Scripts
. .MyFunction.ps1
. .MyFunction2.ps1

3. Update System Variable PSModulePath to include the location of custom modules

Right Click Computer -> Propeties -> Advanced Settings -> Environment Variables -> Add a semi-colon (;) at the end and add the path of the custom module (Ex. C:\Modules)

4.  To test whether the setup is correct, run the Powershell Command Prompt (As Administrator) and type:


Get-Module -ListAvailable

It should display your custom module.


Server(s) Setup Steps:

After the module is properly setup you can now load it on any servers on the network once the following setup steps have been performed:

1. Update System Variable PSModulePath to include the location of custom modules (shared folder)

Right Click Computer -> Propeties -> Advanced Settings -> Environment Variables -> Add a semi-colon (;) at the end and add the path of the custom module (Ex. \\PowershellServer\Modules)

2. Since we are loading the module from a shared location we need to change the execution policy to RemoteSigned. For information about execution-policy see: About Execution Policy. Execute the following script (as Administrator):


Set-ExecutionPolicy RemotedSigned -force

3. After step 2, when you try to load the custom module it will still throw an exception, to solve the problem we need to add the path of shared folder to the list of trusted sites.

Open Internet Explorer -> Tools -> Internet Options -> Go to Security Tab

Click Trusted Sites -> Sites -> In the add type: file://PowershellServer (replace it with actual servername)

Click Add -> Close -> Ok.

Now you can load the custom module from remote powershell server into any of the servers in the network (as long as you did the Server(s) Setup Steps.

Using the shared custom module in powershell remoting is possible but you need to update some settings see my next blog: [Powershell] Missing shared custom modules when using Powershell Remoting

[Powershell] Set user permission in SSRS Item (SQL Reporting Server) using powershell

Combining both (article1 and article2), i was able to come up with a powershell script to set user permission in SQL Reporting Services (SSRS)

<#
.SYNOPSIS
        Set user permissions in SQL Reporting Services using Web Service

.DESCRIPTION
        Set user permissions in SQL Reporting Services using Web Service

.EXAMPLE
        Add-SSRSItemSecurity -webServiceUrl "http://[ServerName]/ReportServer/ReportService2005.asmx" -itemPath "MyReportFolder" -groupUserName RPAULO\User1 -role Browser

.EXAMPLE
        Add-SSRSItemSecurity -url "http://[ServerName]/ReportServer/ReportService2005.asmx" -itemPath "MyReportFolder" -u RPAULO\User1 -r "Content Manager"

#>
function Add-SSRSItemSecurity
(
        [Parameter(Position=0,Mandatory=$true)]
        [Alias("url")]
        [string]$webServiceUrl,

        [Parameter(Position=1,Mandatory=$true)]
        [Alias("path")]
        [string]$itemPath,
        
        [Parameter(Position=2,Mandatory=$true)]
        [Alias("u")]
        [string]$groupUserName,
        
        [Parameter(Position=3,Mandatory=$true)]
        [Alias("r")]
        [string]$role,
        
        [Parameter(Position=2)]
        [bool]$inherit=$true
)

{
        
        #Fix item path if not starting with /
        if(!$itemPath.StartsWith("/")) { $itemPath = "/" + $itemPath}
        
        #Create Proxy
        Write-Host "[Add-SSRSItemSecurity()] Creating Proxy, connecting to : $webServiceUrl"
        $ssrsProxy = New-WebServiceProxy -Uri $webServiceUrl -UseDefaultCredential
        
        $type = $ssrsProxy.GetType().Namespace;
        $policyType = "{0}.Policy" -f $type;
        $roleType = "{0}.Role" -f $type;
        
        Write-Host "[Add-SSRSItemSecurity()] Retrieving all existing policies."
        $policies = $ssrsProxy.GetPolicies($itemPath, [ref]$inherit);
        
        $a = 1;
        foreach($policy in $policies)
        {

                foreach($r in $policy.Roles)
                {
                        $msg = "[Add-SSRSItemSecurity()]  Existing Policy # {0} Group Name: {1}, Role: {2}" -f $a, $policy.GroupUserName, $r.Name
                        Write-Host $msg
                }
                $a+=1;
        }

        $msg = "[Add-SSRSItemSecurity()] Total Existing Policies: " + $policies.Length;
        Write-Host $msg
        
        $Policy = $policies | 
    Where-Object { $_.GroupUserName -eq $groupUserName } | 
    Select-Object -First 1
        
        if (-not $Policy) {
            $Policy = New-Object ($policyType)
            $Policy.GroupUserName = $GroupUserName
            $Policy.Roles = @()
            $Policies += $Policy
                $msg = "[Add-SSRSItemSecurity()] Adding new policy: '{0}'" -f $GroupUserName
                Write-Host $msg
        }

        $r = $Policy.Roles |
            Where-Object { $_.Name -eq $role } |
            Select-Object -First 1
        if (-not $r) {
            $r = New-Object ($roleType)
            $r.Name = $role
            $Policy.Roles += $r
                $msg = "[Add-SSRSItemSecurity()] Adding new role: '{0}'" -f $role
                Write-Host $msg
        }
        
        #Set the policies
        $ssrsProxy.SetPolicies($itemPath,$policies);

}


[Powershell] How to Install/deploy SSRS (rdl files) using Powershell

Since Powershell v2.0 introduce the new cmdlet New-WebServiceProxy, it’s no longer needed to generate a class library to deploy/undeploy SSRS file (RDL), below are two powershell scripts Install-SSRSRDL and Uninstall-SSRSRDL that can be useful when doing an automated deployment or silent installation of rdl files to Reporting Services.

Install SSRS RDL Script:


<#
.SYNOPSIS
        Installs an RDL file to SQL Reporting Server using Web Service

.DESCRIPTION
        Installs an RDL file to SQL Reporting Server using Web Service

.NOTES
        File Name: Install-SSRSRDL.ps1
        Author: Randy Aldrich Paulo
        Prerequisite: SSRS 2008, Powershell 2.0

.PARAMETER reportName
        Name of report wherein the rdl file will be save as in Report Server.
        If this is not specified it will get the name from the file (rdl) exluding the file extension.

.PARAMETER force
        If force is specified it will create the report folder if not existing
        and overwrites the report if existing.

.EXAMPLE
        Install-SSRSRDL -webServiceUrl "http://[ServerName]/ReportServer/ReportService2005.asmx" -rdlFile "C:\Report.rdl" -force

.EXAMPLE
        Install-SSRSRDL "http://[ServerName]/ReportServer/ReportService2005.asmx" "C:\Report.rdl" -force

.EXAMPLE
        Install-SSRSRDL "http://[ServerName]/ReportServer/ReportService2005.asmx" "C:\Report.rdl" -force -reportName "MyReport"

.EXAMPLE
        Install-SSRSRDL "http://[ServerName]/ReportServer/ReportService2005.asmx" "C:\Report.rdl" -force -reportFolder "Reports" -reportName "MyReport"

#>
function Install-SSRSRDL
(
        [Parameter(Position=0,Mandatory=$true)]
        [Alias("url")]
        [string]$webServiceUrl,

        [ValidateScript({Test-Path $_})]
        [Parameter(Position=1,Mandatory=$true)]
        [Alias("rdl")]
        [string]$rdlFile,

        [Parameter(Position=2)]
        [Alias("folder")]
        [string]$reportFolder="",

        [Parameter(Position=3)]
        [Alias("name")]
        [string]$reportName="",

        [switch]$force
)
{
        $ErrorActionPreference="Stop"

        #Create Proxy
        Write-Host "[Install-SSRSRDL()] Creating Proxy, connecting to : $webServiceUrl"
        $ssrsProxy = New-WebServiceProxy -Uri $webServiceUrl -UseDefaultCredential
        $reportPath = "/"

        if($force)
        {
                #Check if folder is existing, create if not found
                try
                {
                        $ssrsProxy.CreateFolder($reportFolder, $reportPath, $null)
                        Write-Host "[Install-SSRSRDL()] Created new folder: $reportFolder"
                }
                catch [System.Web.Services.Protocols.SoapException]
                {
                        if ($_.Exception.Detail.InnerText -match "[^rsItemAlreadyExists400]")
                        {
                                Write-Host "[Install-SSRSRDL()] Folder: $reportFolder already exists."
                        }
                        else
                        {
                                $msg = "[Install-SSRSRDL()] Error creating folder: $reportFolder. Msg: '{0}'" -f $_.Exception.Detail.InnerText
                                Write-Error $msg
                        }
                }

        }

        #Set reportname if blank, default will be the filename without extension
        if($reportName -eq "") { $reportName = [System.IO.Path]::GetFileNameWithoutExtension($rdlFile);}
        Write-Host "[Install-SSRSRDL()] Report name set to: $reportName"

        try
        {
                #Get Report content in bytes
                Write-Host "[Install-SSRSRDL()] Getting file content (byte) of : $rdlFile"
                $byteArray = gc $rdlFile -encoding byte
                $msg = "[Install-SSRSRDL()] Total length: {0}" -f $byteArray.Length
                Write-Host $msg

                $reportFolder = $reportPath + $reportFolder
                Write-Host "[Install-SSRSRDL()] Uploading to: $reportFolder"

                #Call Proxy to upload report
                $warnings = $ssrsProxy.CreateReport($reportName,$reportFolder,$force,$byteArray,$null)
                if($warnings.Length -eq $null) { Write-Host "[Install-SSRSRDL()] Upload Success." }
                else { $warnings | % { Write-Warning "[Install-SSRSRDL()] Warning: $_" }}
        }
        catch [System.IO.IOException]
        {
                $msg = "[Install-SSRSRDL()] Error while reading rdl file : '{0}', Message: '{1}'" -f $rdlFile, $_.Exception.Message
                Write-Error msg
        }
        catch [System.Web.Services.Protocols.SoapException]
        {
                $msg = "[Install-SSRSRDL()] Error while uploading rdl file : '{0}', Message: '{1}'" -f $rdlFile, $_.Exception.Detail.InnerText
                Write-Error $msg
        }

}

Uninstall SSRS RDL Script:


<#
.SYNOPSIS
        Uninstalls an RDL file from SQL Reporting Server using Web Service

.DESCRIPTION
        Uninstalls an RDL file from SQL Reporting Server using Web Service

.NOTES
        File Name: Uninstall-SSRSRDL.ps1
        Author: Randy Aldrich Paulo
        Prerequisite: SSRS 2008, Powershell 2.0

.EXAMPLE
        Uninstall-SSRSRDL -webServiceUrl "http://[ServerName]/ReportServer/ReportService2005.asmx" -path "MyReport"

.EXAMPLE
        Uninstall-SSRSRDL -webServiceUrl "http://[ServerName]/ReportServer/ReportService2005.asmx" -path "Reports/Report1"

#>
function Uninstall-SSRSRDL
(
        [Parameter(Position=0,Mandatory=$true)]
        [Alias("url")]
        [string]$webServiceUrl,

        [Parameter(Position=1,Mandatory=$true)]
        [Alias("path")]
        [string]$reportPath
)

{
        #Create Proxy
        Write-Host "[Uninstall-SSRSRDL()] Creating Proxy, connecting to : $webServiceUrl"
        $ssrsProxy = New-WebServiceProxy -Uri $webServiceUrl -UseDefaultCredential

        #Set Report Folder
        if(!$reportPath.StartsWith("/")) { $reportPath = "/" + $reportPath }

        try
        {

                Write-Host "[Uninstall-SSRSRDL()] Deleting: $reportPath"
                #Call Proxy to upload report
                $ssrsProxy.DeleteItem($reportPath)
                Write-Host "[Uninstall-SSRSRDL()] Delete Success."
        }
        catch [System.Web.Services.Protocols.SoapException]
        {
                $msg = "[Uninstall-SSRSRDL()] Error while deleting report : '{0}', Message: '{1}'" -f $reportPath, $_.Exception.Detail.InnerText
                Write-Error $msg
        }

}

Install-SSRSRDL Powershell Script
Uninstall-SSRSRDL Powershell Script

For permission check this blog: https://randypaulo.wordpress.com/2012/02/22/powershell-set-user-permission-in-ssrs-item-sql-reporting-server-using-powershell/

SSRS Chart Label Missing (X/Y Axis missing)

When designing an SSRS Report using Chart you may notice that some of the labels whether in X or Y axis are not being displayed, this is because it’s so smart that it detects what you actually want (not!). 

To display all labels follow the steps below:

Right click either the X or Y axis, Click Properties:

Set the Interval to 1:

Viola!


BizTalk Archiving – SQL and File Documentation

I moved the documentation from: http://biztalkarchiving.codeplex.com/documentation, since it’s unreadable on the site.
 

BizTalk Archiving SQL and File Documentation


Installation

  1. Run MSI installer
  2. Install it on \BizTalk Server 2010\PipelineComponents.
  3. Go to \BizTalk Server 2010\PipelineComponents\BizTalkMsgArchiveScripts folder, execute RegisterSource.cmd (As administrator), this will register the source so that the pipeline can log to the event log.

Usage – Design Time – VS2010

  1. Open VS2010 -> Create new BizTalk Project -> Add Receive Pipeline
  2. Right Click ToolBox -> Choose Items
  3. Go to BizTalk Pipeline Components -> Check BizTalk Message Archiving Component
  4. New Pipepline Added to the toolbox.
  5. Drag & Drop the BizTalk Message Archiving Component to Decode Stage.
  6. Configure Properties (see Configuration)

Note: You can also configure the Properties using BizTalk Administration Console.

Setup – SQL Archiving

Since the archiving will use an SQL Database, you’ll need to create the database and table.

  1. Go to \BizTalk Server 2010\PipelineComponents\BizTalkMsgArchiveScripts folder.
  2. Execute the CreateDatabase.sql on the target database server. This will create the database named: BizTalkArchiveDb, table named: Messages and stored procedure named: InsMessages

Configuration

  1. Deploy the pipeline that uses the BizTalk Message Archiving Component (See Usage – Design Time – VS2010)
  2. Using BizTalk Administration Console, create a new Receive Location and use the pipeline on previous number, on the pipeline click the Elipsis .. to display properties.
Property Name Description Use In Sample Values Notes
CompressionPassword Password that will be used in zip file File & SQL Archiving P@ssw0rd
DbConnProvider Connection Provider SQL Archiving System.Data.SqlClient
DbConnStr Database connection string SQL Archiving Data Source=localhost;Initial Catalog=BizTalkArchiveDb;Integrated Security=SSPI; Using integrated security you need to grant the identity of the host wherein the receive/send port is binded permission to BizTalkArchiveDb with ff roles: dbdatareaderdatawriter, db and execute permission on the stored procedure InsMessages
DbFileExtensions File extension to be used SQL Archiving .xml
DbPropList This is a set of delimited values of name & namespace of message context properties that will be passed to the stored procedure to be used for custom logging. SQL Archiving ReceivedFileName;http://schemas.microsoft.com/BizTalk/2003/file-properties|ReceivedPortName;http://schemas.microsoft.com/BizTalk/2003/system-properties Format is Property Name;Namespace and for multiple values the delimiter is ‘|’ pipe symbol.
DbSPName Stored procedure name SQL Archiving Built-In: InsMessages The stored procedure can be customized as long as it has the same signature with the default one. For instance, there can be additional logic to parse the Message Properties and insert it into the new custom table
FileArchiveBackFolder Folder / Shared Location / Network location wherein the files will be archived File Archiving \\RPaulo2011\Test\Archive If it’s a shared folder the pipeline will try to use first the identity of the host, if it failed it will use the credentials supplied (see FileArchive UserName, Password, Domain)
FileArchiveFileName Name of the archive file File Archiving %SourceFileName%_%datetime% Supported macros are: – %SourceFileName%, %MessageID%,%datetime%, %time%
FileArchiveIsOverwriteFiles Overwrite Flag File Archiving True
FileArchiveUserDomain Domain name of user credentials File Archiving PAULOR This values will be used if the identity of the host instance doesn’t have permission on the backup folder.
FileArchiveUserName User name File Archiving BizTalkUser This values will be used if the identity of the host instance doesn’t have permission on the backup folder.
FileArchiveUserPwd Password File Archiving P@ssword This values will be used if the identity of the host instance doesn’t have permission on the backup folder.
IsArchiveToDb Archive to database flag SQL Archiving True True = Archive to database, False = Disabled
IsArchiveToFile Archive to file flag File Archiving True True = Archive to file, False = Disabled
IsCompressFile compress file flag SQL & File Archiving True True = Compress the file, False = No compression, It uses DotNetZip

Usage – Downloading Archive Files using ASP.NET

https://randypaulo.wordpress.com/2011/06/21/storing-files-to-database-and-downloading-using-asp-net/

Sending IDOCs to SAP using SSIS – MSSQL Integration Services

Normally receiving and sending IDOCs can be easily done by using BizTalk Adapter for mySAP Business in BizTalk Server which is included in Microsoft BizTalk Adapter Pack 2.0. But what if I want to send an IDOC using SSIS and BizTalk is installed on a different server? Below are the steps on how you can do that.

Note: Since SSIS 2008 only supports <= .NET 3.5 all custom assemblies that will be called within it should be using this framework.

Prerequisites:

1. WCF LOB SDK Adapter (WCF-LOB-Adapter-SDK-2010-x86.exe) – Get it here. or in BizTalk DVD Installer under BizTalk Server\ASDK_X86

2. Microsoft BizTalk Adapter Pack 2.0 x86 – Get Evaluation version here. or in BizTalk DVD Installer under BizTalk Server\AdapterPack_x86

3. SAP Libraries x86 – this needs to be installed on C:\Windows\SysWOW64 folder. See section for SAP Adapter in this Microsoft Adapter Pack 2.0 install guide.

IDOC Library:

Next step is to create an IDOC WCF Client that you can call inside SSIS.

1. Open Visual Studio -> Create a new Project Library.

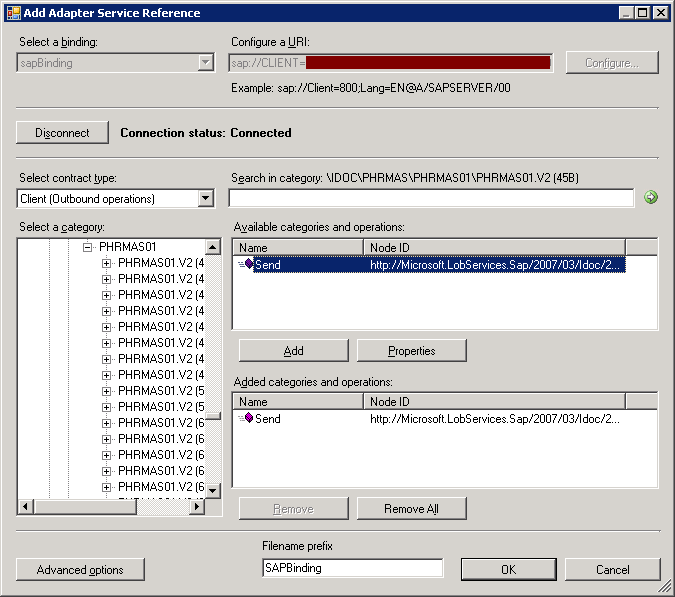
2. Right click the Project -> Click Add Adapter Service Reference.

3. Set the binding to sapBinding and set the configure a URI to:

sap://CLIENT={SAP Client ID};LANG=EN;@A/{Application Server Host}/{System Number}?ListenerGwServ={Gateway Service}&ListenerGwHost={Gateway Host}&ListenerProgramId={Program Id}&RfcSdkTrace=False&AbapDebug=False.  See this help for the configuration

4. Click Configure and set the credentials, then click Connect. Since we are sending IDOCS the contract type should be set to Client (Outbound operations).

5. In the Category, browse for the specific type of IDOC and version, when generating the schema you might encounter an error : “Error returned by RfcCallReceiveEx while calling RFC: IDOCTYPE_READ_COMPLETE..”, It means that you’re selecting an incorrect version of the IDOC, you should ask your SAP resource to identify the Release Number.

Select the Send and click Add. Click OK. This will generate a WCF client that you can call inside SSIS.

6. Sign the Assembly, compile and deploy to GAC then copy to C:\windows\Microsoft.NET\Framework\v2.0.50727.

It’s necessary to copy to this folder so you can add a reference to it in SSIS.

SSIS:

1. Add a data flow.

2. Set OLE DB Source / File / etc.

3. Add a Script Task, set the script task to Script Destination. Double click the script task and change the target framework to .NET 3.5 by going to project properties.

Add reference to the IDOC Library.

Create the IDOC object and pass it to the IDOC WCF Client.

References:

Using Scripting Destination in SSIS

Sample on how to call WCF client in SSIS
To call IDOC WCF Client:

I’ve modified the code and copied it from http://technet.microsoft.com/en-us/library/cc185231(BTS.10).aspx


using System;
using System.Collections.Generic;
using System.Text;

// Add WCF, WCF LOB Adapter SDK, and SAP adapter namepaces
using System.ServiceModel;     //Change the Project to target .NET 3.5 and reference System.ServiceModel
using Microsoft.Adapters.SAP; //This assembly is under the Microsoft Adapter Pack 2.0 install folder
using Microsoft.ServiceModel.Channels; //This assembly is under WCF LOB SDK Install folder

// Include this namespace for WCF LOB Adapter SDK and SAP exceptions
using Microsoft.ServiceModel.Channels.Common;

namespace SapTypeIDOCClient
{
    class Program
    {
        static void Main(string[] args)
        {
            // variable for the IDOC client
            IdocClient idocClient = null;

            Console.WriteLine("IDOC XML client sample started");
            try
            {

                //Construct IDOC Object here. MATMAS01, PHRMAS01, SUBMAS
                var idocObj = new {IDOC OBJECT}

                //Assign Properties and segments of IDOCS here.
                //idocObj.

                // Variable for the GUID
                System.Nullable adapterTxGuid;
                // string to hold the Idoc data
                string idocData;
                // string to hold the SAP transaction ID (TID)
                string sapTxId;

                // The client can be configured from app.config, but it is
                // explicitly configured here for demonstration.
                // set AutoConfirmSentIdocs property to true
                SAPBinding binding = new SAPBinding();
                binding.AutoConfirmSentIdocs = true;

                // Set endpoint address
                EndpointAddress endpointAddress = new EndpointAddress("{SAP Connection String see settings above");

                // Create client and set credentials
                idocClient = new {IDOC WCF Client}(binding, endpointAddress);
                idocClient.ClientCredentials.UserName.UserName = "YourUserName";
                idocClient.ClientCredentials.UserName.Password = "YourPassword";

                // Open the client and send the Idoc
                idocClient.Open();

                //Get a new GUID to pass to SendIdoc. You can also assign a null.
                //value to have the adapter generate a GUID.
                adapterTxGuid = Guid.NewGuid().ToString();

                //We are using the Send Method, it accepts a strongly typed iDOC (XML), SendIdoc sends FlatFile IDOC
                idocClient.Send(idocData, ref adapterTxGuid);

                // The AutoConfirmSentIdocs binding property is set to true, so there is no need to
                // confirm the IDOC. If this property is not set to true, you must call the
                // RfcConfirmTransID method of a TrfcClient with adapterTxGuid to
                // confirm the transaction on the SAP system.

                // Get SAP tx id from GUID
                sapTxId = SAPAdapterUtilities.ConvertGuidToTid((Guid) adapterTxGuid);

                Console.WriteLine("IDOC sent");
                Console.WriteLine("The SAP Transaction Id is : " + sapTxId);

            catch (Exception ex)
            {
                Console.WriteLine("Exception is: " + ex.Message);
                if (ex.InnerException != null)
                {
                    Console.WriteLine("Inner Exception is: " + ex.InnerException.Message);
                }
            }
            finally
            {
                // Close the IDOC client
                if (idocClient != null)
                {
                    if (idocClient.State == CommunicationState.Opened)
                        idocClient.Close();
                    else
                        idocClient.Abort();
                }
            }

        }
    }
}