SSIS – Use timestamp to detect changes

Last week, a solution was required to build an SSIS solution that can pick up all changes from a database using the versionnumber (timestamp) and sync the changes to an external database using the timestamp of the database. This is quite easy to achieve by:

  1. Step 1, retrieve the previous timestamp. Storing the previous timestamp can be easily achieved by create a file using File.WriteAllText method.

 Dim runLastFile = System.IO.Path.Combine(currentPath, “LastRun.txt”)     System.IO.File.WriteAllText(runLastFile, lastRun)

I know it’s in VB but you can easily convert it to C#, since it’s an old solution i didn’t bother to convert it. If the file is not yet existing, you need to create a logic to get the lowest timestamp. Like this:

declare
@minVersion binary(10),
@minVersion_str nvarchar(42)

SET @minVersion = ( SELECT MIN(timestamp fieldName) FROM {sourceTable} )
SET @minVersion_str = upper(sys.fn_varbintohexstr(@minVersion))
SELECT @minVersion_str as LowestVersion

2. Step 2, get the current timestamp from the source database by using MIN_ACTIVE_ROWVERSION, the challenge however is to store this as string/text so the SQL query can be constructed later on in the process. After 15 minutes of googling I was able to find it somewhere (credit to the forum, lost the link).

declare
@currVersion binary(10),
@currVersion_str nvarchar(42)

SET @currVersion = MIN_ACTIVE_ROWVERSION()
SET @currVersion_str = upper(sys.fn_varbintohexstr(@currVersion))
SELECT @currVersion_str as CurrentVersion

3. Step 3, construct the SQL query using the previous timestamp. Something like this:

                         SELECT {sourceColumn}
FROM {sourceTable}
WHERE {timestamp fieldName}  >= @previousTimeStamp

4. Step 4, if the process is successful don’t forget to store the current timestamp.

5. Step 5, start from step 1.

Sending IDOCs to SAP using SSIS – MSSQL Integration Services

Normally receiving and sending IDOCs can be easily done by using BizTalk Adapter for mySAP Business in BizTalk Server which is included in Microsoft BizTalk Adapter Pack 2.0. But what if I want to send an IDOC using SSIS and BizTalk is installed on a different server? Below are the steps on how you can do that.

Note: Since SSIS 2008 only supports <= .NET 3.5 all custom assemblies that will be called within it should be using this framework.

Prerequisites:

1. WCF LOB SDK Adapter (WCF-LOB-Adapter-SDK-2010-x86.exe) – Get it here. or in BizTalk DVD Installer under BizTalk Server\ASDK_X86

2. Microsoft BizTalk Adapter Pack 2.0 x86 – Get Evaluation version here. or in BizTalk DVD Installer under BizTalk Server\AdapterPack_x86

3. SAP Libraries x86 – this needs to be installed on C:\Windows\SysWOW64 folder. See section for SAP Adapter in this Microsoft Adapter Pack 2.0 install guide.

IDOC Library:

Next step is to create an IDOC WCF Client that you can call inside SSIS.

1. Open Visual Studio -> Create a new Project Library.

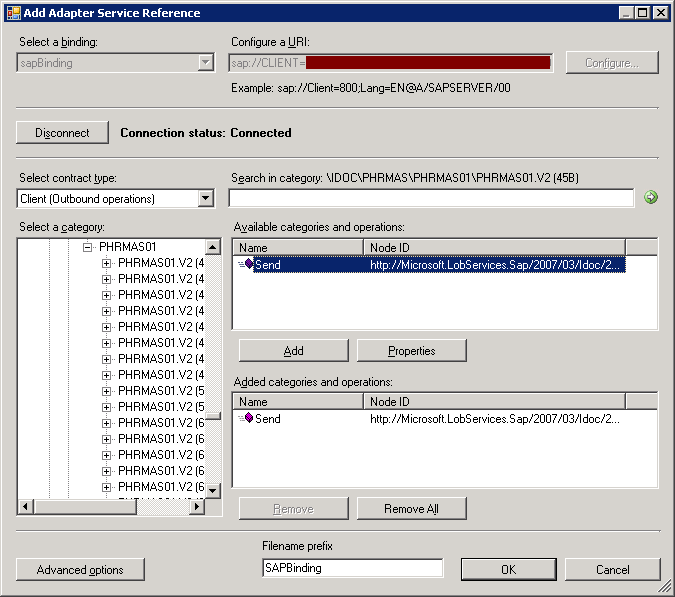
2. Right click the Project -> Click Add Adapter Service Reference.

3. Set the binding to sapBinding and set the configure a URI to:

sap://CLIENT={SAP Client ID};LANG=EN;@A/{Application Server Host}/{System Number}?ListenerGwServ={Gateway Service}&ListenerGwHost={Gateway Host}&ListenerProgramId={Program Id}&RfcSdkTrace=False&AbapDebug=False.  See this help for the configuration

4. Click Configure and set the credentials, then click Connect. Since we are sending IDOCS the contract type should be set to Client (Outbound operations).

5. In the Category, browse for the specific type of IDOC and version, when generating the schema you might encounter an error : “Error returned by RfcCallReceiveEx while calling RFC: IDOCTYPE_READ_COMPLETE..”, It means that you’re selecting an incorrect version of the IDOC, you should ask your SAP resource to identify the Release Number.

Select the Send and click Add. Click OK. This will generate a WCF client that you can call inside SSIS.

6. Sign the Assembly, compile and deploy to GAC then copy to C:\windows\Microsoft.NET\Framework\v2.0.50727.

It’s necessary to copy to this folder so you can add a reference to it in SSIS.

SSIS:

1. Add a data flow.

2. Set OLE DB Source / File / etc.

3. Add a Script Task, set the script task to Script Destination. Double click the script task and change the target framework to .NET 3.5 by going to project properties.

Add reference to the IDOC Library.

Create the IDOC object and pass it to the IDOC WCF Client.

References:

Using Scripting Destination in SSIS

Sample on how to call WCF client in SSIS
To call IDOC WCF Client:

I’ve modified the code and copied it from http://technet.microsoft.com/en-us/library/cc185231(BTS.10).aspx


using System;
using System.Collections.Generic;
using System.Text;

// Add WCF, WCF LOB Adapter SDK, and SAP adapter namepaces
using System.ServiceModel;     //Change the Project to target .NET 3.5 and reference System.ServiceModel
using Microsoft.Adapters.SAP; //This assembly is under the Microsoft Adapter Pack 2.0 install folder
using Microsoft.ServiceModel.Channels; //This assembly is under WCF LOB SDK Install folder

// Include this namespace for WCF LOB Adapter SDK and SAP exceptions
using Microsoft.ServiceModel.Channels.Common;

namespace SapTypeIDOCClient
{
    class Program
    {
        static void Main(string[] args)
        {
            // variable for the IDOC client
            IdocClient idocClient = null;

            Console.WriteLine("IDOC XML client sample started");
            try
            {

                //Construct IDOC Object here. MATMAS01, PHRMAS01, SUBMAS
                var idocObj = new {IDOC OBJECT}

                //Assign Properties and segments of IDOCS here.
                //idocObj.

                // Variable for the GUID
                System.Nullable adapterTxGuid;
                // string to hold the Idoc data
                string idocData;
                // string to hold the SAP transaction ID (TID)
                string sapTxId;

                // The client can be configured from app.config, but it is
                // explicitly configured here for demonstration.
                // set AutoConfirmSentIdocs property to true
                SAPBinding binding = new SAPBinding();
                binding.AutoConfirmSentIdocs = true;

                // Set endpoint address
                EndpointAddress endpointAddress = new EndpointAddress("{SAP Connection String see settings above");

                // Create client and set credentials
                idocClient = new {IDOC WCF Client}(binding, endpointAddress);
                idocClient.ClientCredentials.UserName.UserName = "YourUserName";
                idocClient.ClientCredentials.UserName.Password = "YourPassword";

                // Open the client and send the Idoc
                idocClient.Open();

                //Get a new GUID to pass to SendIdoc. You can also assign a null.
                //value to have the adapter generate a GUID.
                adapterTxGuid = Guid.NewGuid().ToString();

                //We are using the Send Method, it accepts a strongly typed iDOC (XML), SendIdoc sends FlatFile IDOC
                idocClient.Send(idocData, ref adapterTxGuid);

                // The AutoConfirmSentIdocs binding property is set to true, so there is no need to
                // confirm the IDOC. If this property is not set to true, you must call the
                // RfcConfirmTransID method of a TrfcClient with adapterTxGuid to
                // confirm the transaction on the SAP system.

                // Get SAP tx id from GUID
                sapTxId = SAPAdapterUtilities.ConvertGuidToTid((Guid) adapterTxGuid);

                Console.WriteLine("IDOC sent");
                Console.WriteLine("The SAP Transaction Id is : " + sapTxId);

            catch (Exception ex)
            {
                Console.WriteLine("Exception is: " + ex.Message);
                if (ex.InnerException != null)
                {
                    Console.WriteLine("Inner Exception is: " + ex.InnerException.Message);
                }
            }
            finally
            {
                // Close the IDOC client
                if (idocClient != null)
                {
                    if (idocClient.State == CommunicationState.Opened)
                        idocClient.Close();
                    else
                        idocClient.Abort();
                }
            }

        }
    }
}

SSIS – Centralize Connection Repository

Maintaining a central repository for all connection information for SSIS packages is important especially if you have multiple packages that connects to one or more different systems. Keeping track and performing changes on the connections will be hard if not done properly.

This blog entry will describe on how to use SQL Configuration Type to store the connection info in combination with the traditional File ConfigurationType (dtsConfig) to store package specific configurations.

1. Setting up the configuration store

A table with definition below needs to be created on an new/existing database, this will store the connection information.

SSIS Configurations
Column Name Type Description
ConfigurationFilter

Nvarchar(255)

This field is used by SSIS to indentify a set of property/values pairs that are part of the same configuration entry in the Package Configurations Organizer.
ConfiguredValue

Nvarchar(255)

It stores the value that is used to update the package property specified in PackagePath column
PackagePath

Nvarchar(255)

The path that point to the property being configured
ConfiguredValueType

Nvarchar(255)

the SSIS data type of the property being configured

2. Environment Variable

In this step, we would create an environment variable which will store the connectionString information to the configuration store (see step1).

1. On the Start menu, click Control Panel.

2. In Control Panel, double-click System.

3. In the System Properties dialog box, click the Advanced tab, and then click Environment Variables.

Figure 1 – System Properties

4. In the Environment Variables dialog box, in System variables frame, click New.

In the New System Variables dialog box, type SSISConfiguration in the Variable name box, and Data Source={DatabaseServer};Initial Catalog={DatabaseName};Provider=SQLNCLI10.1;Integrated Security=SSPI;Auto Translate=False; in the Variable value box.

5. Click OK.

6. Click OK to exit the System Properties dialog box.

3. SSIS Package Settings

It is assumed that the package is already in the final phase of development and the only thing needs to be done is to update it to retrieve settings from the configuration store and use it during runtime.

 3.1 Add Configuration Store connection

Since we are going to retrieve connection settings from configuration store that is a table we need to define a new OLE DB connection that does that.

1. In the Connection Managers, right click New OLE DB Connection.

2. Click New, Set the valid credentials to connect then on the Connect to a database server(this is the connection to cofiguration store) , Select <{Database}>.

3. In the Connection Managers rename the added connection to OLEDB_SSISConfiguration.

 3.2 Configure Configuration Store Connection

In the following steps we are going update the connection to configuration store to use the environment variable we defined step (3.1)

1. Click SSIS Menu, Package Configurations. Package Configurations Organizer opens.

2. Click Enable package configurations.

3. Click Add, Click Next.

4. In the Configuration Type, Select Environment variable.

In the Environment variable drop-down, Select SSISConfiguration.

Click Next.

Note:
If the SSISConfiguration is not on the list try re-opening the BIDS (Business Intelligence Development Studio)

5. In the Select Property Page in the Connection Managers,

Click OLEDB_SSISConfiguration,

Click Properties, Select ConnectionString.

Click Next.

6. Type OLEDB_SSISConfiguration in the Configuration name and click Finish.

7. It should look like this:

3.3 Configure existing connection to use configuration store.

 After the connection to configuration store is properly setup the next step is to update existing connections in the package to retrieve settings from it.

Important:
Repeat the steps per connectionin the Package. If the package has connection to 2 database, the steps below needs to be repeated 2x.Example below illustrates an SSIS package that has connection to a database: SampleDB.

1. Click SSIS Menu, Package Configurations.

Package Configurations Organizer opens.

2. Click Add, Click Next.

3. In the configuration Type, Select SQL Server.

In the Connection, Select OLEDB_SSISConfiguration

In the Configuration Table, Select [dbo].[SSISConfigurations]

In the Configuration Filter, Set it to the <name of the connection>,

Ex. OLEDB_SampleDB.

Click Next.

4. In the Connection Managers, Select the connection (name of collection in step 3), Properties, Select ConnectionString.

Click Next.

Important:
Select only one ConnectionString in this step since the entire step will be repeated per connection. This makes sure that the settings defined in configuration store can be reused in other packages.

5. In the Configuration Name, type the name of connection (in step 3). Click Finished.

6. Repeat steps for other connections (if applicable).

7. Update the SSISConfiguration Table if SQL Login is used since SSIS doesn’t save sensitive information such as password.

Note:
Set the connection manager to DelayValidation=TRUE if during the execution the validation fails. For some reason, it uses the value in the package and not the values from the SQL Configuration store (Database).
If you encountered this error:“Cannot insert configuration information into the configuration table. (Microsoft.DataTransformationServices.Wizards)   Could not complete wizard actions.”

It means that one of the properties exceed the length limit of the SSIS configuration table, normally it’s the connection string that causes the problem. Try to shortened the connection string by truncating the Application Name property or try to giving it a short name.

SSIS How to copy files from one server to another

The common question is how to copy/move/delete files across shared folder using SSIS.
Quick answer is to use the File System Task for the actual file operations, but how about the permissions?
By default it assumes that the account the you’ll use to execute the package (SSIS) either the SQL Server Agent identity (using sql job) or account that executes DTExec have appropriate permissions on the source/destination server.

To get the identity of SQL Server Agent:

1. In the command prompt, type services.msc, this would open the list of all services on the server.

2.  In the list of services, look for SQL Server Agent, Right Click -> Properties. Go to Logon Tab

Using Proxy. If it’s other identity than the Agent:

1. In the Security -> Credentials -> Create new credentials (username and password)

2. then go to SQL Agent -> Proxies -> SSIS Package Execution -> Create a new Proxy and assign the credentials. Then on the sql job itself assign the Run as = proxy.

Using NET USE command, If you need to connect to multiple resources (shared folder) or doesn’t use SQL Server Agent.

Issue the NET USE command before the File System Task. Example syntax:

net use RPAULO\\SharedFolder /user:RPAULO\SSISUser

for NET USE command refrence, click here.


SSIS Tips & Tricks Best Practice

I’ve been developing SSIS for quite sometime now and below are some tips and tricks I’ve used to make solution to be more consistent, fast and efficient.

1. Shape names (tranform shapes), use prefix, I use a 3 letter acronym. For ex. Execute SQL Task name it like EST Update Status.

2. Do use  Sequence Container to group related task/shapes.

3. Variables 

3.1 Limit the scope, create the variables closer to the shape that would use it.

3.2 Use Pascal casing for variables that will be configurable in dtsConfig and camel casing for the rest. This will make your life easier, by the time you’re configuring the dtsConfig it will be easy to identify which ones are to be included.

3.3 Variable access – instead of manually adding ReadOnlyVariables and ReadWrite Variables on the Script Task, you can use the script below to access and set the values of the variables without having to encounter the nasty variable is locked error.

Private Function GetValue(ByVal variableName As String) As Object
Dim var As Variables
Dim objVal As Object
Dim varName As String = "User::" & variableName
Dts.VariableDispenser.LockForRead(varName)
Dts.VariableDispenser.GetVariables(var)
objVal = var(varName).Value
var.Unlock()
GetValue = objVal
End Function

Private Sub SetValue(ByVal variableName As String, ByVal value As Object)
Dim var As Variables
Dim varName As String = "User::" & variableName
Dts.VariableDispenser.LockForWrite(varName)
Dts.VariableDispenser.GetVariables(var)
var(varName).Value = value
var.Unlock()
End Sub
End Class

4. Error Handling –  Use precedance constraint to handle failure instead of using Event Handlers.  The reason for this is that, it’s more simple, clean and easy to spot. 🙂 Also, sometimes using event handler will give you weird cryptic error that is both waste of time and unnerving.

5. Package properties–  Set the Protectionlevel to DontSaveSensitive and SuppressConfigurationWarning to True.

Setting the protection level will save you from:

Failed to decrypt protected XML node “DTS:Password” with error 0x8009000B

this is assuming that you are using Integrated Security or will going to use SQL Configuration Table see Item# 8.

SuppressConfigurationWarning, just like what the property indicates. This maybe because the location of dtsConfig in your production is different from your virtual or dev machine.

6. Bulk Update – You might be tempted to use a OLEDB Command to perform an update, but this is the slowest possible way since it means that this command will be executed multiple times based on the total number of rows.

Faster way is to create a temporay table on the target database, populate that table then do an execute sql task performs the update. Aside from the normal db_datareader/writer permission you’ll need a db_ddladmin permission to drop and create tables.

UPDATE d
d.Column1 = t.Column1,
d.Column2 = t.Column2
FROM DestinationTable d
INNER JOIN TmpTable t ON (d.Key = t.Key)

7. For parallel data processing you can use the Balanced Data Distributor for SSIS, this component can be downloaded seperately from
Microsoft.

For the quick demo click here.

To download click here

8. If the number of SSIS projects will grow overtime especially when connecting to different sources maintaining the connectionString will be hard if not centralized. To implement centralize configuration for SSIS see this article:  https://randypaulo.wordpress.com/2011/12/02/ssis-centralize-connection-repository/

Lastly, make sure that connecting lines between task is straight :), it just look more professional and nice if it is.

Happy coding..

Connecting Visual Studio 2005, Visual Studio 2008 to TFS 2010

There’s lots of reasons on why some people are still using and stucked with Visual Studio 2005 / 2008, one is if you’re using BizTalk Server. Every BizTalk version is tied up to a particular version of IDE,  BizTalk 2006/R2 needs VS2005, BizTalk 2009 needs VS2008 and so on.

If you’re one of the people stucked with BizTalk 2006 / 2009 then you’re probably wondering on how you’re going to connect if the source control is migrated to Microsoft Team Foundation Server (TFS) 2010. Below summarizes the list on how to connect VS2005/2008 to TFS 2010.

Microsoft Visual Studio 2005 to Microsoft Team Foundation Server 2010:

What you need to install (sequential order):

  1. Install Visual Studio Team Explorer 2005 (Download)
  2. Install Visual Studio 2005 SP1 (Download)
  3. Install Visual Studio Team System 2005 SP1 Forward Compatibility (Download)
  4. Update Registry, open Registry Editor by typing regedit in run. Browse to HKEY_CURRENT_USER\Software\Microsoft\VisualStudio\8.0\TeamFoundation\Servers\ and a new String Value value named: TFS2010 (This can be any value) and value data:  http://{yourserver}:{port}/tfs/{CollectionName} sample value data: https://randypaulo.com:8080/tfs/BtsCodes don’t add a ‘/’ at the end because it will not work.

 
Microsoft Visual Studio 2008 to Microsoft Team Foundation Server 2010:

What you need to install (sequential order):

  1. Install Visual Studio Team Explorer 2008 (Download)
  2. Install Visual Studio 2008 Service Pack 1 (Download) (Setup installer)
  3. Install Visual Studio Team System 2008 SP1 Forward Compatibility (Download)
  4. Update Registry, open Registry Editor by typing regedit in run. Browse to HKEY_CURRENT_USER\Software\Microsoft\VisualStudio\9.0\TeamFoundation\Servers\ and a new String Value value named: TFS2010 (This can be any value) and value data:  http://{yourserver}:{port}/tfs/{CollectionName} sample value data: https://randypaulo.com:8080/tfs/BtsCodes don’t add a ‘/’ at the end because it will not work.


>C# – Uploading file to Sharepoint Document Library using Web Services without Sharepoint SDK

>Creating Proxy Class for Copy.asmx

1) Go to Visual Studio Tools – > Open Visual Studio Command Prompt
2) Type wsdl “http://%5Bsharepoint server]/_vti_bin/Copy.asmx, this would generate a Copy.cs class that we’ll be using later.
3) Add the Copy.cs to the Visual Studio solution.

Modifying Copy.cs

1) Open the Copy.cs and add a namespace. Ex. MyPOC.SharepointServices
2) Go to Copy Constructor. If the SP site needs authentication you need
to add this line:
this.Credentials = new System.Net.NetworkCredential(“[username]”, “[password]”, “[domain]” )

Uploading the File

MyPOC.SharepointServices.Copy copy = new Copy();
FieldInformation[] info = new FieldInformation[] { new FieldInformation()} ;
string url = “http://anyurl”;;
string destUrl = new string[] {“http://sharepointserver/%5Bcomplete path of document library]”};

string fileToUpload = “c:\test.doc”;

CopyResult[] results;

copy.CopyIntoItems(url,dest,info,File.ReadAllBytes(fileToUpload), out results);