Normally receiving and sending IDOCs can be easily done by using BizTalk Adapter for mySAP Business in BizTalk Server which is included in Microsoft BizTalk Adapter Pack 2.0. But what if I want to send an IDOC using SSIS and BizTalk is installed on a different server? Below are the steps on how you can do that.
Note: Since SSIS 2008 only supports <= .NET 3.5 all custom assemblies that will be called within it should be using this framework.
Prerequisites:
1. WCF LOB SDK Adapter (WCF-LOB-Adapter-SDK-2010-x86.exe) – Get it here. or in BizTalk DVD Installer under BizTalk Server\ASDK_X86
2. Microsoft BizTalk Adapter Pack 2.0 x86 – Get Evaluation version here. or in BizTalk DVD Installer under BizTalk Server\AdapterPack_x86
3. SAP Libraries x86 – this needs to be installed on C:\Windows\SysWOW64 folder. See section for SAP Adapter in this Microsoft Adapter Pack 2.0 install guide.
IDOC Library:
Next step is to create an IDOC WCF Client that you can call inside SSIS.
1. Open Visual Studio -> Create a new Project Library.
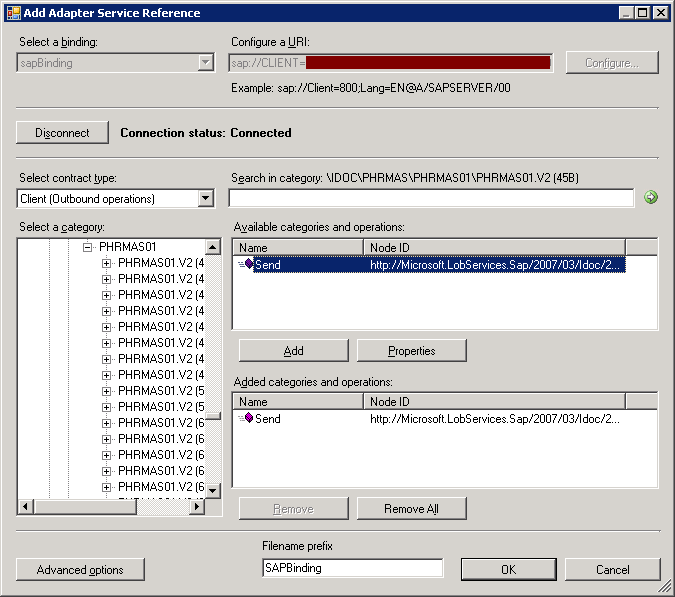
2. Right click the Project -> Click Add Adapter Service Reference.
3. Set the binding to sapBinding and set the configure a URI to:
sap://CLIENT={SAP Client ID};LANG=EN;@A/{Application Server Host}/{System Number}?ListenerGwServ={Gateway Service}&ListenerGwHost={Gateway Host}&ListenerProgramId={Program Id}&RfcSdkTrace=False&AbapDebug=False. See this help for the configuration
4. Click Configure and set the credentials, then click Connect. Since we are sending IDOCS the contract type should be set to Client (Outbound operations).
5. In the Category, browse for the specific type of IDOC and version, when generating the schema you might encounter an error : “Error returned by RfcCallReceiveEx while calling RFC: IDOCTYPE_READ_COMPLETE..”, It means that you’re selecting an incorrect version of the IDOC, you should ask your SAP resource to identify the Release Number.
Select the Send and click Add. Click OK. This will generate a WCF client that you can call inside SSIS.
6. Sign the Assembly, compile and deploy to GAC then copy to C:\windows\Microsoft.NET\Framework\v2.0.50727.
It’s necessary to copy to this folder so you can add a reference to it in SSIS.
SSIS:
1. Add a data flow.
2. Set OLE DB Source / File / etc.
3. Add a Script Task, set the script task to Script Destination. Double click the script task and change the target framework to .NET 3.5 by going to project properties.
Add reference to the IDOC Library.
Create the IDOC object and pass it to the IDOC WCF Client.
References:
Using Scripting Destination in SSIS
Sample on how to call WCF client in SSIS
To call IDOC WCF Client:
I’ve modified the code and copied it from http://technet.microsoft.com/en-us/library/cc185231(BTS.10).aspx
using System;
using System.Collections.Generic;
using System.Text;

// Add WCF, WCF LOB Adapter SDK, and SAP adapter namepaces
using System.ServiceModel;     //Change the Project to target .NET 3.5 and reference System.ServiceModel
using Microsoft.Adapters.SAP; //This assembly is under the Microsoft Adapter Pack 2.0 install folder
using Microsoft.ServiceModel.Channels; //This assembly is under WCF LOB SDK Install folder

// Include this namespace for WCF LOB Adapter SDK and SAP exceptions
using Microsoft.ServiceModel.Channels.Common;

namespace SapTypeIDOCClient
{
    class Program
    {
        static void Main(string[] args)
        {
            // variable for the IDOC client
            IdocClient idocClient = null;

            Console.WriteLine("IDOC XML client sample started");
            try
            {

                //Construct IDOC Object here. MATMAS01, PHRMAS01, SUBMAS
                var idocObj = new {IDOC OBJECT}

                //Assign Properties and segments of IDOCS here.
                //idocObj.

                // Variable for the GUID
                System.Nullable adapterTxGuid;
                // string to hold the Idoc data
                string idocData;
                // string to hold the SAP transaction ID (TID)
                string sapTxId;

                // The client can be configured from app.config, but it is
                // explicitly configured here for demonstration.
                // set AutoConfirmSentIdocs property to true
                SAPBinding binding = new SAPBinding();
                binding.AutoConfirmSentIdocs = true;

                // Set endpoint address
                EndpointAddress endpointAddress = new EndpointAddress("{SAP Connection String see settings above");

                // Create client and set credentials
                idocClient = new {IDOC WCF Client}(binding, endpointAddress);
                idocClient.ClientCredentials.UserName.UserName = "YourUserName";
                idocClient.ClientCredentials.UserName.Password = "YourPassword";

                // Open the client and send the Idoc
                idocClient.Open();

                //Get a new GUID to pass to SendIdoc. You can also assign a null.
                //value to have the adapter generate a GUID.
                adapterTxGuid = Guid.NewGuid().ToString();

                //We are using the Send Method, it accepts a strongly typed iDOC (XML), SendIdoc sends FlatFile IDOC
                idocClient.Send(idocData, ref adapterTxGuid);

                // The AutoConfirmSentIdocs binding property is set to true, so there is no need to
                // confirm the IDOC. If this property is not set to true, you must call the
                // RfcConfirmTransID method of a TrfcClient with adapterTxGuid to
                // confirm the transaction on the SAP system.

                // Get SAP tx id from GUID
                sapTxId = SAPAdapterUtilities.ConvertGuidToTid((Guid) adapterTxGuid);

                Console.WriteLine("IDOC sent");
                Console.WriteLine("The SAP Transaction Id is : " + sapTxId);

            catch (Exception ex)
            {
                Console.WriteLine("Exception is: " + ex.Message);
                if (ex.InnerException != null)
                {
                    Console.WriteLine("Inner Exception is: " + ex.InnerException.Message);
                }
            }
            finally
            {
                // Close the IDOC client
                if (idocClient != null)
                {
                    if (idocClient.State == CommunicationState.Opened)
                        idocClient.Close();
                    else
                        idocClient.Abort();
                }
            }

        }
    }
}


